
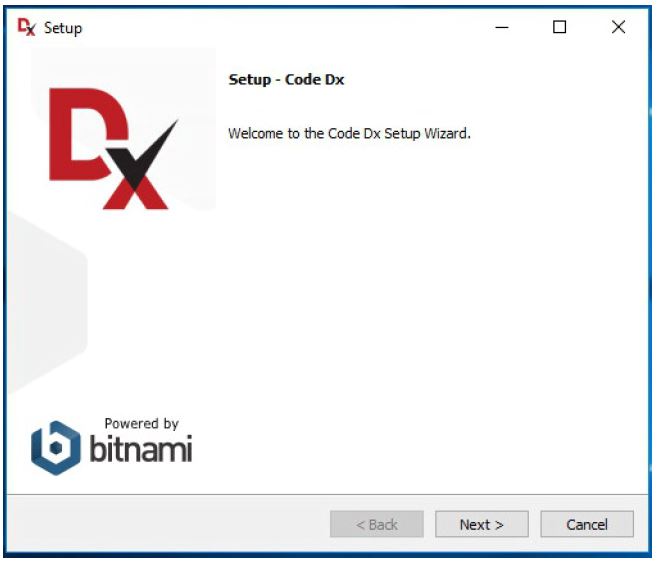
インストールの手引き
本ページは、初めて Code Dx Ecnterprise をお使いになるお客様が、出来る限りスムーズにインストール及び初期の設定を行えるよう、情報提供をするためのページです。Code Dx Enterprise の ”Install Guide“から、特に注意すべき点を重点に記載しています。本ページは、最新の Install Guide に基づいて作成していますが、完全な翻訳ではなく、重要な部分の抜粋の日本語訳だったり、必要に応じて足りなかったり分かりにくい説明の箇所を、補間しています。詳細な確認は、”Install Guide” をご参照下さい。
直下に目次を置きましたが、不要の場合は、1行目の “Contents [hide]” の “hide” をクリックすると目次が折りたたまれて見やすくなります。(目次を再表示するには、”hide” を再度クリックして下さい)
目次
- 1 インストールの手引き
- 1.1 前提条件
- 1.2 インストール
- 1.3 Code Dx Enterprise の設定
- 1.3.1 Code Dxのデータ・ディレクトリについて
- 1.3.2 設定ファイル
- 1.3.3 データベース接続の設定
- 1.3.4 インターネットへのアクセス
- 1.3.5 Active Directory/LDAP Configuration
- 1.3.6 SAML Configuration
- 1.3.7 ヘッダ・ベースによる認証
- 1.3.8 External User Auto-Registration
- 1.3.9 Auto-Registration with LDAP
- 1.3.10 セッションの有効期限
- 1.3.11 EULA 受諾
- 1.3.12 Gitに関連する設定
- 1.3.13 ジョブの設定 (Job Configuration)
- 1.3.14 解析の振る舞い (Analysis Behavior)
- 1.3.15 トレースセッションのアーカイブ (Trace Session Archival)
- 1.3.16 Remember-Me 設定
- 1.3.17 レポートテンプレート生成の設定 (Report Configuration Templates)
- 1.3.18 レポートファイル名 (Report Filename)
- 1.3.19 PDF Report Configuration
- 1.3.20 ツールの設定 (Tool Configuration)
- 1.3.21 JVMシステム・プロパティ (JVM System Properties)
- 1.3.22 プロキシ設定 (Proxies)
- 1.3.23 Visual Log Configuration
前提条件
ハードウエアの前提条件
以下に、Code Dx Enterprise が稼働するためのハードウエアの条件を示します。
ハードウエアの条件は、様々な利用環境に大きく依存するため、ここで示す条件は目安の域を出ません。そのため、実際には評価時に、お客様の利用環境での評価をしていただき、実運用時のハードウエアの条件を検討して頂くことが、安全なやり方です。
CPU:Dual-core CPU
RAM:8GB
ハードディスク:10 GB(SSDを使う事を強く推奨します)
OS:Windows (10 and Server 2012 R2+), macOS 10.14+, or Linux (Ubuntu 16+, RHEL/CentOS 7+)
ソフトウエアの前提条件
Code Dx Enterprise を使う為に必要なソフトウエアは、インストール時に一括インストールされます。
.NETに関して、より効果的に利用するために、以下の2つのバンドル・ツールを使用しますが、ライセンスの条件によりインストーラに同梱しての再配布ができません。そのため、これらのツールについては、お客様側でインストールして頂く必要があります。
- FxCop
- CAT.NET
.NET 解析
In order to run the bundled .NET tools supported by Code Dx, the. NET Framework runtime is required for Windows and the Mono runtime is required for Linux and Mac. Additionally, Dependency-Check requires the .NET Core runtime on all platforms.
Windowsを使う場合
It is recommended that the latest version of .NET be installed. Code Dx is capable of running multiple .NET analysis tools on your codebase. FxCop and CAT.NET are two of the supported tools and are developed and distributed by Microsoft. The end-user license agreements for these products forbid their redistribution, therefore, we are unable to legally bundle these tools.
So in order for Code Dx to run these tools on your behalf, you must install them separately. Code Dx will then automatically discover their location and run them.
Depending on the version of FxCop you plan to use, it will either be bundled with Visual Studio (as Code Analysis) or in the Windows SDK. For the best results, install Visual Studio 2012, 2013, or 2015 Premium. This will give you the latest
rules available. Code Dx will automatically discover the location of the latest version of FxCop installed on your machine. If you would like to provide a specific location, set the fxcop.path property in the Code Dx configuration file (codedx.props). Code Dx supports versions 10, 11, 12, and 14 of FxCop. Since FxCop 10, Microsoft has stopped shipping a stand-alone version of FxCop and instead ships it as part of Visual Studio. Despite the Visual Studio dependency, it is recommended to install the latest version of Visual Studio to get the latest version of FxCop.
Code Dx will work with either CAT.NET 32-bit or CAT.NET 64-bit. CAT.NET 32-bit has an installer and Code Dx will automatically look in the default installation directory for this application. The 64-bit version is in a zip file. The best approach to using the 64-bit version is to overwrite the 32-bit files with the 64-bit files. Alternatively, the path can be manually set using the cat.net.path property in the Code Dx configuration file.
インストール
同一のマシンに、複数の Code Dx をインストールすることはは可能ですが、推奨しません。多くの場合、リソース不足になって、それにより、性能低下を招く結果になります。
Linux で考慮すべき事
低レベルのLinux環境用に、インストーラはコマンドラインで対話的にインストールするオプションがあります。以下のように–mode text オプションを使います。
ここで、”4.4.6-0“の部分は、実際にダウンロードしたインストーラのバージョン番号に置き換えます。
インストーラは、一般ユーザから起動される場合とroot(あるいは、sudo コマンド経由)ユーザ(特権ユーザ)から起動される場合とで、振る舞いが変わります。
指示されるデフォルトディレクトリやポート番号が変わります。(root ユーザの場合は、ポート80を使いますが、一般ユーザの場合は8080を使います)
運用のためのインストールの場合には、特に、root/sudo特権で、インストーラの起動が必要です。
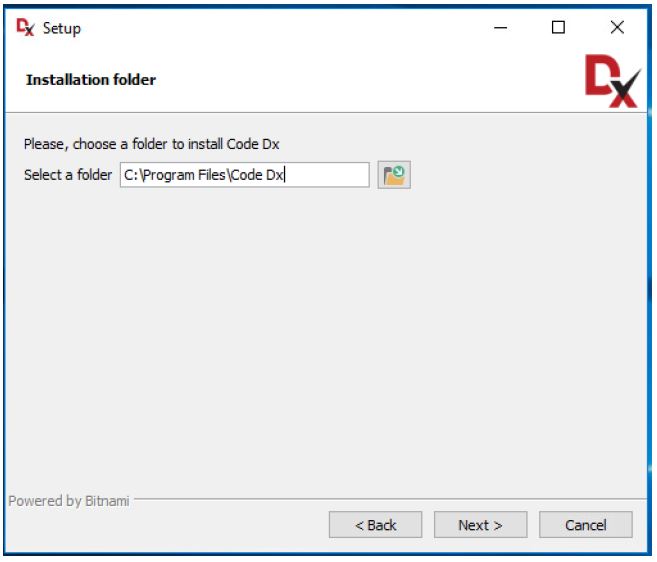
インストールディレクトリ
Code Dx のインストーラは、依存するファイルや実行ファイルをインストールディレクトリに格納します。プラットフォーム毎に、一番共通的なディレクトリを提案しますが、お客様の指定するディレクトリを選択することも可能です。
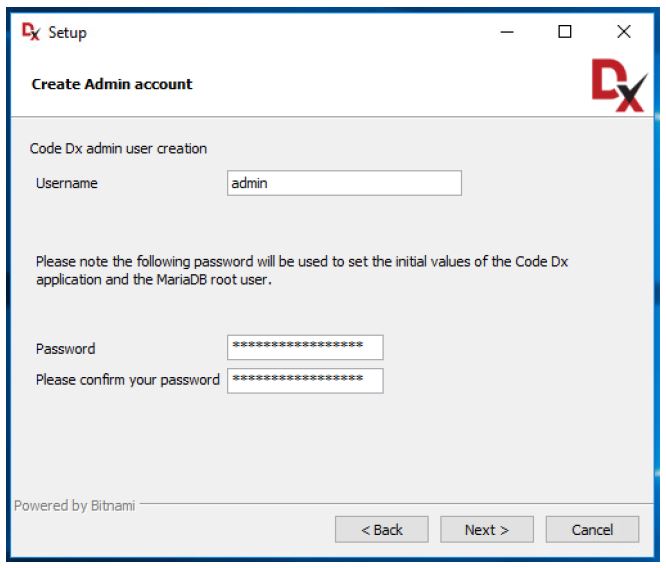
管理者アカウント
Cdoe Dx は、それ自身を管理するための管理者ユーザが必要です。インストール時に、その管理者の資格情報が要求されます。この時入力した資格情報は、一旦作成すると、検索が不可能なため、安全な場所に保管して下さい。新しいCode Dxがリリースされた時には、インストーラをダウンロードして実行して下さい。(インストールの具体的な手順は、プラットフォームに依存します。ダウンロードページのインストール指示をご確認下さい)最終的にインストールを完了させるためには、元の資格情報が必須です。
(注)初めてCode Dxを使う時には、その管理者資格情報でログインが必要ですが、一旦ログインできた後には、Code Dx内で再設定が可能ですが、追加インストールの際には、最初に入力した資格情報が必須です。一度Code Dxに入って資格情報を変更した場合でも、インストール時の資格情報は必須です。
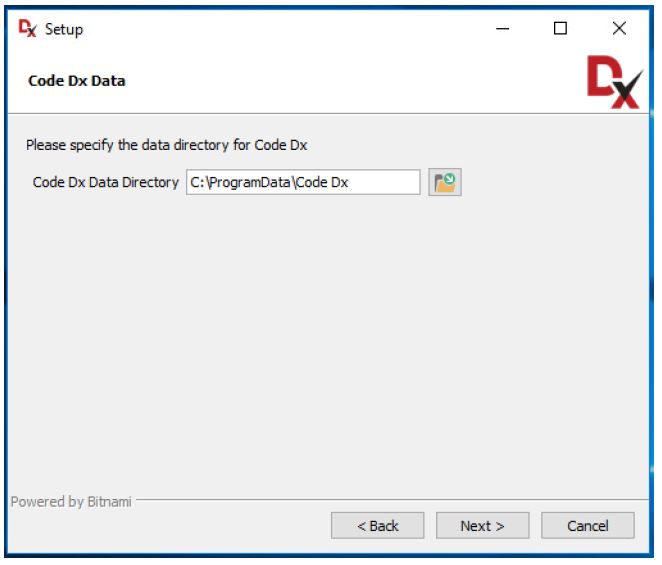
データ・ディレクトリ
Code Dxはインストール時に設定したデータ・ディレクトリにデータを格納します。プログラム本体の格納ディレクトリ同様に、プラットフォーム毎に一番共通的なディレクトリを提案しますが、お客様が指定することも可能です。運用の為のインストールの際には、Code Dxが管理するデータが、バックアップ対象のディレクトリに含まれるように、設定することを強く推奨します。
インストール時間の見積
以上の設定が完了したら、インストールが開始されます。インストールにはかなりの時間を要する場合があります。ただ、マシンの環境条件に大きく依存するため、事前に正確に見積ことはできません。
SSL の設定(HTTPSとHTTP)
本項は、Code Dx Enterprise と、そのユーザが使うブラウザ間の通信の設定についての説明です。
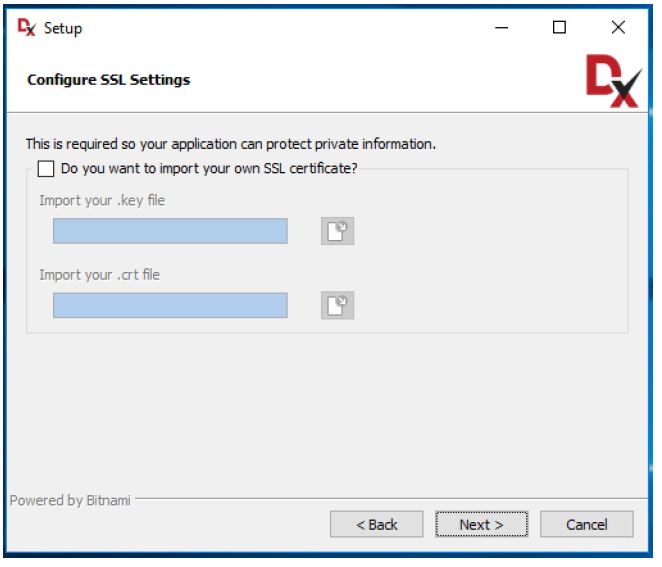
デフォルトで、インストーラはCode Dxを、HTTPあるいはHTTPSどちらも利用可能であるように設定します。評価はこのままの状態で可能ですが、実際の運用に当たっては、使用するホストのマシンに、有効なSSL証明書を準備して使用することを強く推奨します。
インストール時に、正規の証明書を使わない場合、自己署名証明書を自動的に生成してHTTPSが有効化され使用可能になります。これにより、Code Dxを利用するユーザは、安全な通信を保障されます。なお、自己署名証明書を利用した場合、大抵のブラウザは、Code Dxへ接続するときに、セキュリティ警告を表示するため、ユーザはそれを承認する必要があります。
Code Dx をネットワークに接続された環境で使う場合には、HTTPSを使って接続することを推奨します。
【例】
(推奨)HTTPS使用の場合:https://codedx.yourserver
(参考)HTTP使用の場合: http://codedx.yourserver
「codedx.yourserver」の部分を実際のマシンのアドレスに書き換える。
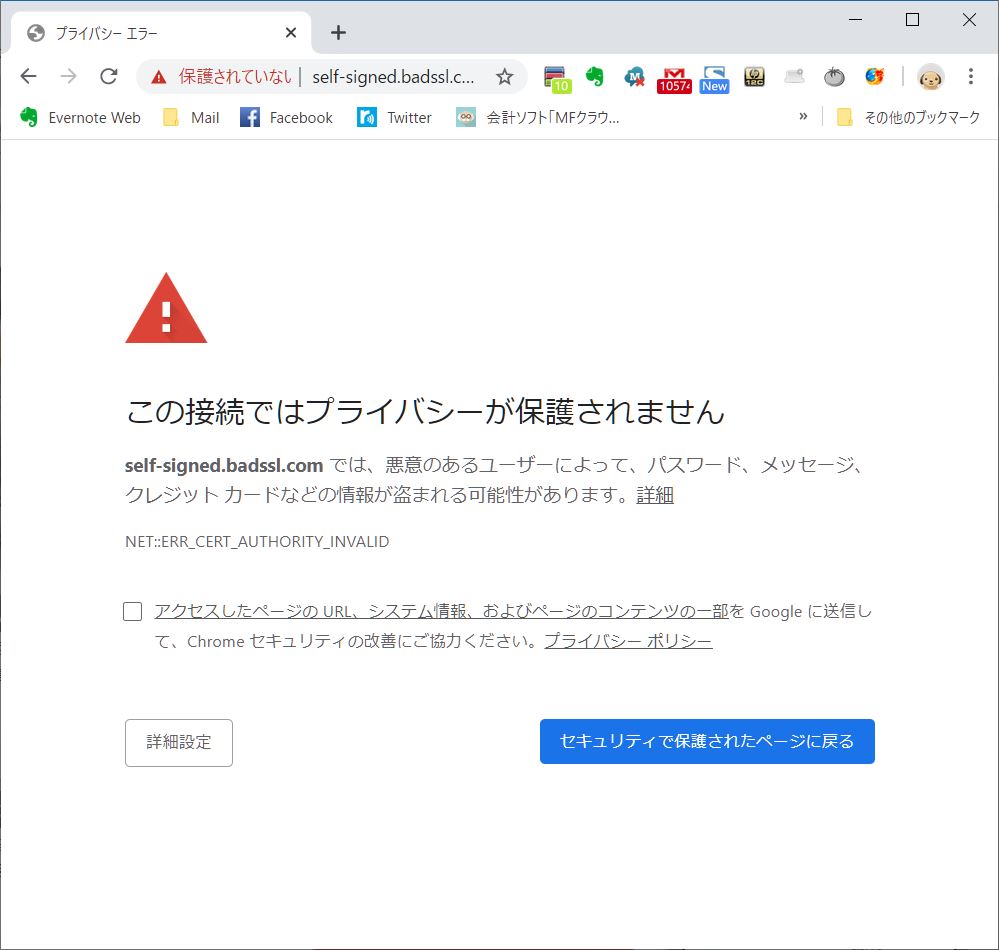
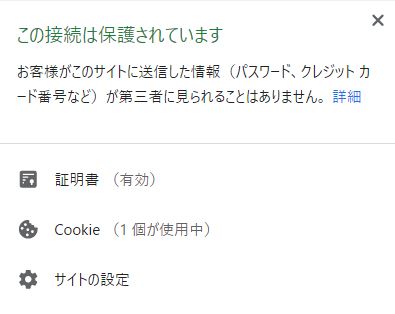
自己署名証明書を信頼させる(Trusting Self-Signed Certificates)
本項は、Code Dx Enterprise から、他のサーバにHTTPS接続が必要な場合のCode Dx Enterprise 側の設定について説明したものです。HTTP接続の場合は本項は設定不要です。
JIRA、Git あるいは、別のツールを接続する場合に、それぞれのツール毎に接続の設定が必要になります。
HTTPSを使用して、これらのツールのサーバに接続する場合、Code Dx に相手のサーバの証明書を信頼させる必要があります。相手の証明書を、Code Dx のサーバに追加してあっても、さらに、Code Dx が実行されるJavaの Trust Store に証明書を追加する必要があります。
証明書が信頼されていない場合、Code Dx は相手のツールと接続する際に、以下のメッセージを出す場合があります。
Couldn’t Connect to …
Code Dx に、相手サーバの自己署名証明書を信頼させるるためには、以下のステップで、証明書を Code Dx の Java Trust Store に追加します。
1. 証明書のコピーをファイルとして入手する
- 以下のステップは、Windows上でChromeを使う場合を示しています。
- 今使用しようとしている、信頼されていない証明書しかないページへ、お客様のブラウザを使って移動します。例えば、Chromeブラウザの場合下記の手順になります。
- URLバーの鍵アイコンをクリックして、接続情報をポップアップさせます。
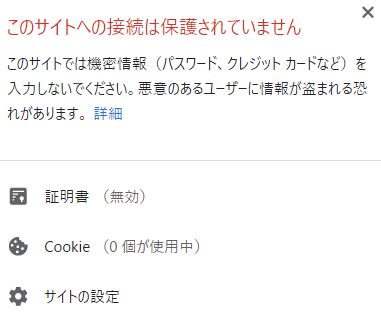
- 自己署名証明書の場合、「このサイトへの接続は保護されていません」のようなメッセージが表示されます。また、「詳細」「証明書」他のリンクが表示されます。
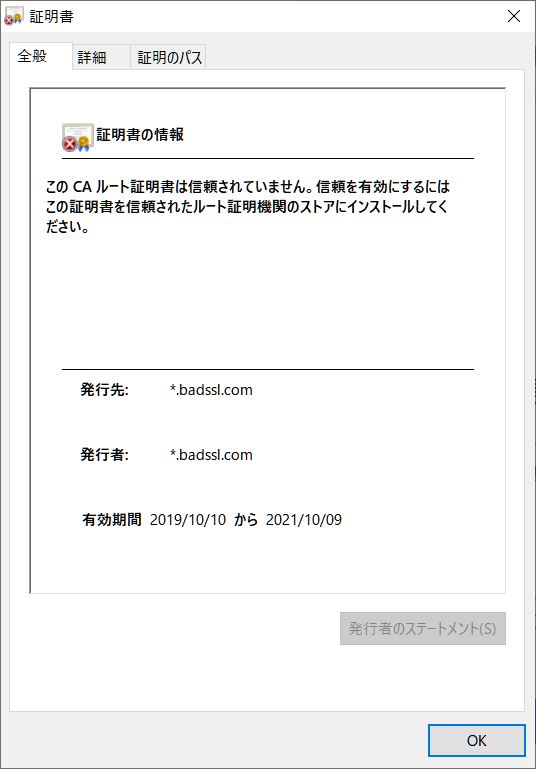
- 「証明書」のリンクをクリックすると、証明証情報が表示されます。
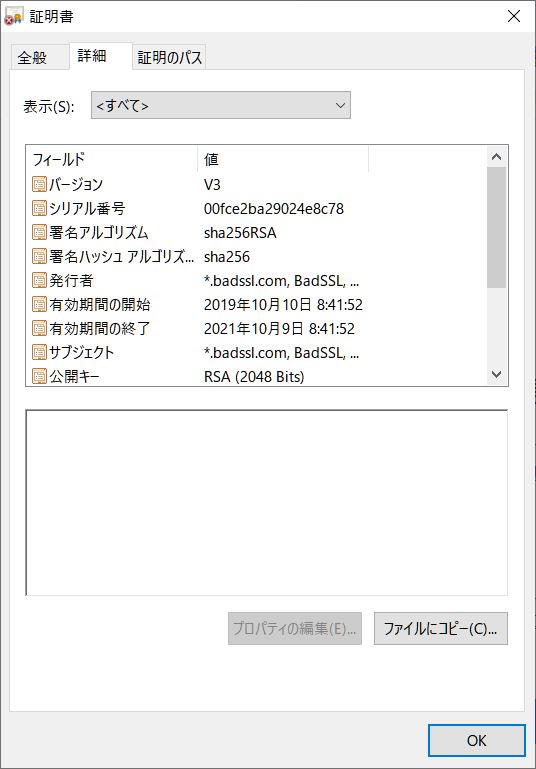
- 「詳細」タブを開くと、証明書の詳細情報を見ることが出来ます。
- 「ファイルへコピー」ボタンを押します。
- 証明書をデフォルトの「DER encoded binary X.509 (.CER)」形式で保存します。
- 例えば、「C:\my-self-signed.cer」などのパス・ファイル名で保存します。
- 正常に保存ができれば、「完了」のメッセージが表示されますので、それを確認して終了します。
2.保存された、*.cer ファイルをCode Dx のJava環境のキーストアに追加します。
- 管理者権限のコマンドプロンプトを開きます。(Program Files ディレクトリ配下のファイルを変更するために必要)
- cd C:\Program Files\Code Dx\java\bin を実行して、Javaの実行ファイルの場所に移動します。パスは、インストール時のインストールパス指定に従って下さい。この例は標準のインストールパスの場合です。
- Keytoolを実行します。「keytool -import -keystore ..\lib\security\cacerts -file C:\my-self-signed.cer」をコマンドラインで実行します。なお、「C:\my-self-signed.cer」の部分は、実際にお客様が *.cer ファイルを保存した場所とファイルを指定します。
- キーストアのパスワードを要求されたら、「変更 (Change it)」します。新しいパスワードを設定します。
- 「この証明書を信頼しますか?(Trust this certificate)」と聞かれたら、Yes で進めます。
- 完了すると「証明書はキーストアに追加されました(Certificate was added to keystore)と表示されます。
3.Code Dx のサービスを再起動し、今設定したキーストアの内容を反映させます。なお、サービスの再起動の方法は、お客様使用のプラットフォームに依存しますので、その説明書等をご参照下さい。
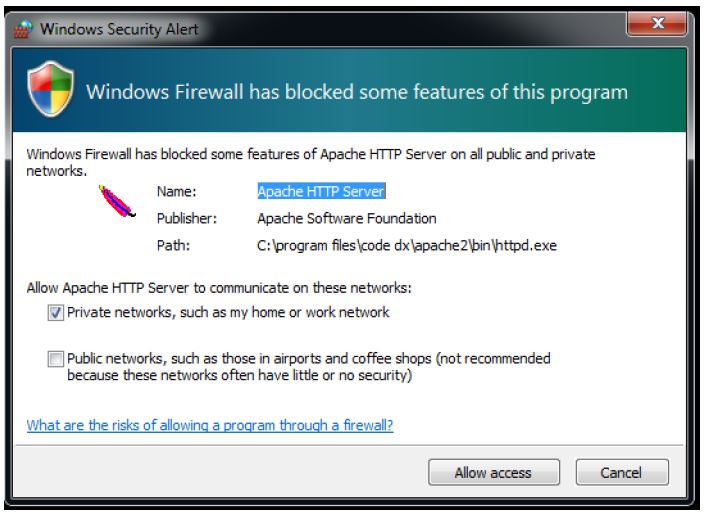
ファイアウォール
Code DxはWebアプリケーションですので、Code Dxを稼働するためにWebサーバを必要とするため、自動的にApache Webサーバをインストールして設定します。一方、サーバの外部から、クライアントが接続する場合には、ファイアウオールを経由するため、このファイアウォールの設定も必要になります。
デフォルト設定で、利用可能にすべきポートは、HTTPが80、HTTPSが443です。Windowsでは、右の図の警告が表示されて、ファイアウォールの例外を許可する必要があります。
ライセンス・ファイル
ライセンスをお持ちでない場合、ライセンスが期限切れになった場合は、ライセンスの取得が必要になります。
通常、ライセンスは、Code Dxをご購入頂いた時あるいは、評価版を入手されたときの営業窓口から、ファイルの形式でお渡しします。必要があれば、営業窓口にご連絡下さい。
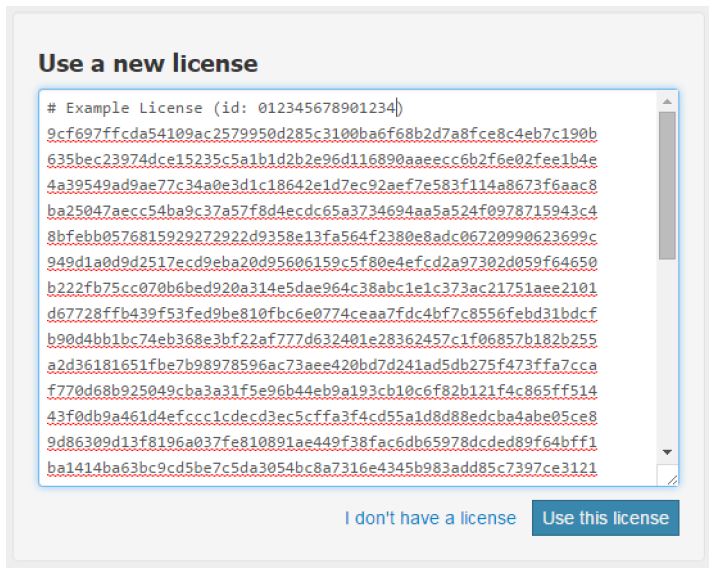
新ライセンスのインストール
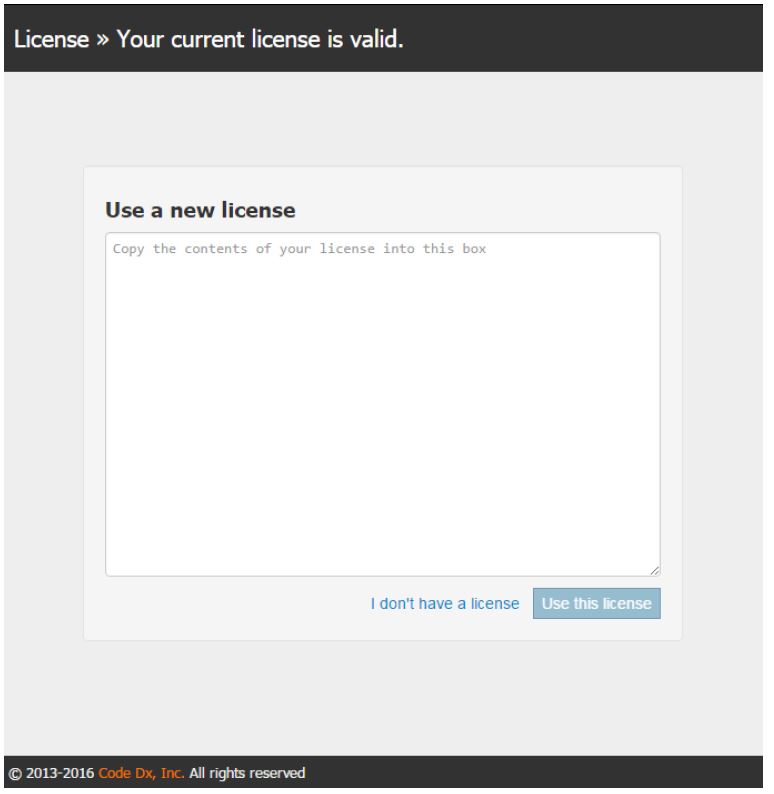
新規にライセンスをインストールする場合、右図のライセンス管理ページにアクセスする必要があります。初めてご利用になる場合、あるいは、ライセンス期限切れの場合は、ライセンス管理ページが自動的に表示されます。それ以外の場合には、管理者ページ(Admin Page)のTOPに表示されている、ライセンスサマリリンクをクリックすると、ライセンス管理ページが表示されます。
右の図に、初めてライセンス管理画面を開いたときの様子を示します。
ヘッダー領域には、現在のライセンスの状態が表示されます。この例の場合は、ライセンスが有効である事を示していますが、ライセンスが期限切れあるいは無効の場合には、ヘッダにその旨が表示されます。
ライセンスの内容あるいは、ライセンスファイルがご不明であれば、営業窓口までお問合せ下さい。
営業窓口がご不明の場合は、ELTのホームページの「サポート・お問合せ・お問合せ(全般)」経由でご連絡下さい。
アンインストール/再インストール
アンインストーラが、Code Dxが使っているデータを削除するかどうかを問い合わせてきます。データを削除する場合、一旦削除したデータは、復旧不可能ですので、注意して下さい。
Code Dx Enterprise の設定
Code Dxでは、インストール時に指定する設定項目以外に、さらに追加の設定項目があります。これらの設定は、設定ファイル(Configuration File)の変更により設定することができます。通常は、インストール直後のデフォルト値のままで設定を変更する必要はありません。
Code Dxのデータ・ディレクトリについて
Code Dx は、種々のデータを保存する場所(以下、appdata)が必要です。データには、結果表示のためのソースコードを含む解析の入力、ログファイル、設定ファイルなどがあります。これらのデータは、Code Dx が正常に継続して稼働するために必須です。従って、これらのデータを格納する領域は、安定してアクセス出来、かつ、定期的にバックアップが取られる領域が必要です。通常は、これらの領域を参照する必要はありませんが、場合に応じて、設定を変更する場合には、参照が必要になります。
appdataフォルダの位置は、Code Dx が最初にインストールされるときに設定されます。デフォルトでは、下記の場所です。
C:\ProgramData\Code Dx\codedx_appdata\ on Windows,
/var/opt/codedx/ on Linux (installed as root),
/home//codedx/apps/codedx/codedx_data/codedx_appdata/ on Linux (installed as non-root),
/opt/codedx/ on Docker-based installations,
/Applications/codedx/apps/codedx/codedx_data/codedx_appdata/ on macOS.
設定ファイル
Log Configuration File
Code Dx は Logback(Javaのログ機構ライブラリ)を使っています。サンプルのlogbackk.xmlファイルが、appdataディレクトリに入っています。詳細のロギングの構成方法については、Logbackのマニュアルを参照して下さい。
設定を変更したときには、Tomcatを再起動する必要があります。この再起動は、「Code Dx Manager Tool」の「Manage Servers」タブを開いて、Tomcat サーバを選択して、Stop/Startすることにより行います。
Code Dx のプロパティ・ファイル (Code Dx Properties File)
最も重要な、設定ファイルは、「codedx.props(以下、props ファイル)」です。これは、appdata ディレクトリに置かれています。このprops ファイルの設定内容は、データベースの接続情報、解析の振る舞い、を含め色々の局面を制御します。特に、Active Directory 統合も制御します。このpropsファイル内のデータ形式は、キー・値の組を使ったテキストファイルです。このファイルを変更する場合には、該当の行の先頭にある「#」記号を消して使います。先頭の「#」は、コメントを示します。
データベース接続の設定
Code Dx はMariaDBデータベースにデータを格納します。このMariaDBデータベースはインストール時に自動的にインストールされ設定されます。Code Dx データベース接続には、以下のようなプロパティが使われます。また、これらはインストール時に自動的に設定されますので、設定の変更はしないで下さい。特別に、代替えのデータベースをCode Dx用に使うなど、積極的な理由がない限りは、設定の変更は不要です。また、設定を変更した場合には、将来のアップグレードをインストーラがスムーズに出来ない事態が予想されます。
swa.db.url – The JDBC URL of the database Code Dx will be communicating with
swa.db.user – The username that will be used to access the database
swa.db.password – The password that will be used to access the database
例えば、Code Dx が同じマシン上のMariaDBデータベースと通信するためには、”database_username”と”database_password”の設定が必要です。
swa.db.url = jdbc:mysql://localhost/codedx
swa.db.user = database_username
swa.db.password = database_password
インターネットへのアクセス
Code Dxは、バックグラウンドで実行する特定の機能のために、インターネットへのアクセスを利用します。たとえば、ツールのデータを最新に保つために、新しいCode Dxのリリースの有無をを定期的にチェックします。インターネット接続がない場合でも、Code Dxは正常動作しますが、前記のような更新が行えないため一部制限が出る場合があります。
Code Dxが全機能を発揮するためにはインターネットへの接続が必要ですが、全てのインストール時にそうすることができない事も承知しています。接続できない場合は、そのような場合でも制限付きで実行することができます。
Code Dx は、Code Dx Enterprise を実行するサーバ自身が何かの理由でインターネットに接続されていない状態でも動作可能です。一方、強制的にインターネット接続を禁止した状態での利用も可能です。Code Dxによるバックグラウンドのインターネットアクセスを強制的に不活性にするには、「codedx.offline-mode = true」をpropsファイルに追加して下さい。(この設定をした状態をオフラインモードと呼びます)デフォルトはFalseです。なお、この設定はユーザのアクションあるいは設定の結果発生するインターネットアクセスを全て不活性にするわけではありません。不活性にならない通信としては、Tool Connector、Git、Issue Tracker の設定などです。
Code Dxをオフラインモードにするか、あるいはインターネット接続がない状態にすると、以下のような機能が使えなくなります。
- 更新の通知:Code Dxは定期的に新しいバージョンをチェックし、新しい更新があったときに通知する事を止めます。
- 依存性チェック更新:Dependency-CheckはNational Vulnerability Database (Retire.jsリポジトリ)から定期的に更新情報をダウンロードすることが出来なくなります。あるいは、Javaの依存関係をスキャンするときのMaven Central参照が出来なくなります。結果、False PositiveやFalse Negative の除去が甘くなる可能性が出ます。
これによって、バンドルツールのDependency-Checkを実行するときに、チェックの品質低下につながります。
Active Directory/LDAP Configuration
英文の Install Guide をご参照下さい。
SAML Configuration
英文の Install Guide をご参照下さい。
ヘッダ・ベースによる認証
Code Dxはリクエストヘッダによりユーザ認証を行います。Code Dxサーバへのリクエスト中に、構成されたヘッダにユーザ名を値として持つ場合は、ログイン中として扱われます。オプションとして、そのようなリクエストを出せるIPアドレスを制限することができます。例えば、もし、認証を自分自身で管理して、認証されたリクエストだけにそのヘッダを追加するプロキシー背後にCode Dxがあれば、そのプロキシーサーバのIPアドレスを唯一の許可されたIPアドレスと指定できるでしょう。
リクエストヘッダの名前は、許可されたIPアドレスの集合とともに、以下のcodedx.props ファイルに設定します:
codedx.header-authentication.header = My-Magic-Authentication-Header
codedx.header-authentication.allowed-ips = 172.1.1.1, 127.0.0.1, 0:0:0:0:0:0:0:1
ヘッダーキーにはデフォルト値はありません。もし、省略された場合、Header-Based認証は不許可になります。もし、許可されたIPアドレスのキーが指定されなければ、全てのIPアドレスは許可されたモノとみなされます。そして、その事はログに警告として記録されます。なぜなら、許可されたIPのホワイトリストを持たないように設定される事は、推奨されないからです。(★もう少し正確な訳を)
一度設定されれば、Header-Based認証とユーザ名/パスワードログインは相互に背反の手段になります。ユーザ名/パスワードでログインした場合は、ヘッダ認証ではログインできません。あるいはその逆もできません。Header-Basedセッションの場合は、ログアウトの機能はありません。代わりに、ユーザは認証されたヘッダを持つリクエストを送るのを止める必要があります。
External User Auto-Registration
英文の Install Guide をご参照下さい。
Auto-Registration with LDAP
英文の Install Guide をご参照下さい。
セッションの有効期限
デフォルトでは、ログアウトするまでログインされたユーザのセッションは継続します。下記の設定をすれば、一定時間、不活動の時にセッションが期限切れになるよう設定が可能です。:
session.lifetime – sets the duration of inactivity required before automaticallysigning out a user; if unassigned, sessions will never expire
session.timeout-notice – sets the point at which the user will be notified when their session will expire
これらのプロパティは両方とも期限のフォーマットで記述します:例えば 1 hour、 1 hour and 30 minutes、 3 days 等です。セッションの期限切れを有効にするには、session.lifetimeの設定が必要ですが、session.timeout-notice はオプションです。もし、これがアサインされなかければ、タイムアウト通知は、2分間か、セッション期限の25%の時間か、どちらか短い方が使われます。セッション期限が有効になっていれば、ユーザのセッションはその期限がタイムアウトするか、あるいは、ユーザがブラウザを閉じたときに終了します。もし、セッションの期限終了が有効になっていて、remember-me機能がfullに設定されていれば、remember-me 機能は自動的に無効になります。もし、セッション期限切れがSAML認証と一緒に使われている場合は、shiro.saml2.realm.forcAuth = true であるかどうかを確認して、ユーザが常にldPとの認証をやりなおさなければならなくなるようにします。
If session expiration is enabled and remember-me functionality is set to full,
remember-me will be effectively disabled.
If combining session expiration with SAML authentication, make sure to set
shiro.saml2.realm.forceAuth = true so that the user always has to re-authenticate with
your IdP.
EULA 受諾
通常は、CodeDxの最初のインストールにおいて、end-userライセンス条項(EULA)が、最初の管理者ユーザにログインしたユーザに、表示されます。この過程は、EULA受諾をPropsファイルで受諾すれば、省略することができます。
codedx.eula-accepted = true
Gitに関連する設定
Code Dxでは、個々の解析の入力として、自動的にGitリポジトリからソースを取り込むように、プロジェクトを設定することが可能です。Gitリポジトリに接続する設定をするときに、デフォルトではCode Dxは、ローカルのURL(Code Dx 自身のファイルシステムへのURL)は許可しません。妥当性チェックインタフェースを通じてシステム情報が公開されてしまわないよう、セキュリティ施策の観点から強制されています。この設定は無効にしておく事がすいしょうされますが、例外的な場合には、ローカルのGitリポジトリにアクセスが必要な場合には、git.config.allow-local-urls をTrueに設定することがあります。
Code Dx allows you to configure each project to automatically use source from a git
repository as input for each analysis. When configuring a connection to a git
repository, Code Dx will, by default, disallow the usage of “local” URLs (i.e., URLs
that point to a file in Code Dx’s own file system). This is enforced as a security
measure to prevent system information exposure via the validation user interface.
Although it is strongly recommended that this setting be left disabled, in the
exceptional cases where it is necessary to use local git repositories, set the
git.config.allow-local-urls property to true.
ジョブの設定 (Job Configuration)
Code Dxはジョブシステムにおけるバックグラウンドのクリーンアップタスクを含む、大抵の長時間実行のタスクを実行することができます。システムがオーバーロードにならないことを保証するために、そのような並行タスクの数を制限することができます。以下のリソースの制約は調整が必要な場合があります。より大きな数値は、そのタイプにおいて、より多くのリソースを必要とします。
許される最小値は1000であり、デフォルトは2000です。設定される値は単位がありません。お客様のCode Dx サーバの処理能力の相対的な値です。個々の実行されているジョブは、一定の量の「制限値」を使います。これが、ジョブの並行性を制約するメカニズムです。これらの値は、デフォルト値から相対的に調整されるべきです。つまり、もし、お客様のサーバが、平均的サーバの2倍の性能であれば、この値は、4000(つまり、デフォルト値の2倍)に設定され、実行可能な並行ジョブの数を増やすようになります。
swa.jobs.cpu-limit determines the maximum available CPU
swa.jobs.memory-limit determines the maximum available memory
swa.jobs.database-limit determines the maximum available database I/O
swa.jobs.disk-limit determines the maximum available disk I/O
さらに、ジョブによっては(例えばプロジェクトに対してレポートを生成する)、何かを出力する場合があります。swa.jobs.expiration(デフォルト60)の設定はそのジョブ実行に必要な時間を分単位で指定します。
解析の振る舞い (Analysis Behavior)
- storage.keep-raw-inputs (default: true) – when this setting is true, Code Dx will keep copies of all files uploaded for analysis. While these inputs are not required by Code Dx after the analysis is complete, keeping them for archival purposes will allow them to be downloaded from the Show Inputs list. If storage space isan issue, setting this to false will prevent Code Dx from storing the raw inputs.
- storage.keep-archived-inputs (default: false) – when this setting is true, Code Dx will keep all uploaded files, regardless of if they are archived or not. Leaving this setting false will cause Code Dx to delete stored copies of data upon archival. Please note this setting is dependent upon the value of storage.keep-raw-inputs, which must also be true in order to keep the archived data.
- swa.tools.keep-all-logs (default: false) – this setting determines whether or not to
keep all the log files for the tools that Code Dx runs. If false, only the logs
from failures are kept. - swa.upload.maxfilesize (default: 2048) – this setting controls the maximum file
upload size allowed (in megabytes) for a single file. - swa.upload.maxuploadsize (default: 2048) – this setting controls the maximum size
of all uploaded files (in megabytes) for a single analysis. - codedx.analysis.hybrid-enabled-by-default (default: false) – this setting determines the
default value for “Enable hybrid analysis” setting in Analysis Config. Since
hybrid analysis requires some relatively time-consuming steps, this setting is
false by default. - codedx.analysis.auto-archive-enabled-by-default (default: true) – this setting determines
the default value for the “Archive findings” setting in Analysis Config. Most
projects will only upload a scan from a tool if it represents a new state of the
project, but an organization may want to be able to upload many tool result
files in sequence without having them interfere with each other. Such
organizations should set this setting to false. - codedx.analysis.auto-archive.excluded-tools (default: none) – this setting allows
excluding outputs from certain tools from the auto archival process. This
setting is a comma-separated list of the names of the tools to exempt from
auto archival. - ingestion.skip-code-metrics (default: false) – if set to true, code metrics will not be
gathered during analysis - finding.reopen-gone (default: true) – this setting determines the default value for
the “Allow gone findings to be reopened” setting in Analysis Config - finding.reopen-resolved (default: false) – this setting determines the default value
for the “Reopen resolved findings when updated” setting in Analysis Config - storage.keep-failed-analysis-inputs (default: false) – this setting determines whether
or not to keep files associated with failed analyses
バンドルツール (Bundled Tools)
Code Dx は、解析プロセスの最中に独立に実行される様々なツールをバンドルしています。個々のツールは、それ自身が解析を行う時にメモリを必要とします。解析ツールがチェックしているコードベースのサイズによって、メモリの消費量は変動します。個々のツールに必要なメモリ量は、プロパティファイルで設定することが出来ます。以下のそれぞれの設定は、メガバイト単位の数字を指定します。一般的に、静的解析ツールは、プロジェクトが大きくなるほど大きなメモリを必要とします。
- java.tools.maxmemory (default: 1024 (1GB)) determines the maximum heap size for java-based tools.
- ruby.tools.maxmemory (default: 1024 (1GB)) determines the maximum heap size for Ruby-based tools, which are run with Java via JRuby.
- python.tools.maxmemory (default: 1024 (1GB)) determines the maximum heap size for Python-based tools, which are run with Java via Jython.
- cat.net.maxmemory (default: 2048 (2GB)) determines the maximum allowed memory usage for CAT.NET.
- php.tools.maxmemory (default: 1024 (1GB)) determines the maximum heap size for PHP tools.
さらに、これらのバンドルされたツールは、bundled-tools.disable をTrueに設定する(デフォルトはFalse)ことにより完全に無効化できます。このフラグが設定されると、New Analysisページや実行時にバンドルされたツールは表示されません。
トレースセッションのアーカイブ (Trace Session Archival)
Code Dxのトレース機能を、ハイブリッド解析の為に、使用する場合は、巨大なトレースデータが収集されて時間と共に蓄積されます。Code Dxのサーバの不可を軽減するために、トレースセッションは自動的にアーカイブされます。トレースセッションのアーカイブは、以下の効果があります:
・アーカイブされたセッションはInstrumentation Pageで非表示にされます。また、表示されたときには、それが分かるよう特別に表示されます。
・アーカイブセッションからのデータで、結果データに出てこない(つまり、DASTツールのFindings に出てこない)ものは自動的に削除されます。
The session contains trace data that is associated with result data in the project (i.e. you just uploaded the DAST tool results after running a scan with tracing active).
The session is at least 24 hours (configurable) old, and a newer session exists, belonging to the same agent, which is already archived.
codedx.ingestion.trace-session-archival.enabled (default true) – if set to false, Code Dx will not automatically archive any trace sessions.
codedx.ingestion.trace-session-archival.unused-sessions (default true) – if set to false, Code Dx will not automatically archive “old” trace sessions (the 2nd of the criteria listed above).
codedx.ingestion.trace-session-archival.unused-sessions.age-threshold-hours (default 24) – determines how old (based on end time) a trace session must be before it can be considered an “old” session and become a candidate for auto-archival under the 2nd criteria listed above.
Remember-Me 設定
ユーザの利便のため、Code Dx はオプションで、ユーザのログイン状態を信頼できるデバイスに保存可能です。この機能へのサポートはデフォルトで有効になっていますが、これは以下の3つのレベルのどれかに、swa.user.rememberme フィールドで設定可能です。サポートしている設定地は以下です:
- full – Code Dx will remember any user who logs in. Once logged in, users will not need to log in via the login form even after their session expires. They willbe remembered by a special cookie, until that cookie expires. The rememberMecookie does not contain the user’s password in any way, shape, or form.
- username-only – Code Dx will remember the username of any user who logs in. This is used to auto-fill the username field of the login form. Users are
remembered by a cookie, until that cookie expires. This cookie simply contains the user’s name. - off – Code Dx will not remember anything about a user once that user’s session expires or if they log off.
Note: for full and username-only modes, users can opt-out of being remembered by
Code Dx by unchecking the “remember me” checkbox in the login form.
レポートテンプレート生成の設定 (Report Configuration Templates)
Several report configuration options accept templates for their values. These templates may contain plain text and various substitutions, surrounded by {{ and }}. To include a { } or \, prefix them with a backslash (e.g., \{).
The available substitutions are:
- {{report.name}} or {{report.type}} – the type of report, e.g., ‘PDF’
- {{project.id}} and {{project.name}} – the ID or name of the project the report was generated for {{user.name}} – the display name of the user who generated the report
- {{date:pattern}} – the current date/time formatted with the given pattern; details on acceptable patterns may be found here
Enterprise users may also include project metadata values as well:
- {{meta:foo}} or {{metadata:foo}} – provides the contents of the metadata field
named “foo” for the project (or a blank string if that value is not specified) - {{meta.id:bar}} or {{metadata.id:bar}} – provides the ID of the chosen metadata value for the field named “bar” (or a blank string if one was not given)
The following modifiers may be applied to any value:
- ltruncate:length – will take up to the last length characters (shortening from the left
of the string) - truncate:length or rtruncate:length – will take up to the first length characters
(shortening from the right of the string) - labbreviate:length – will take up to the last length characters, inserting an ellipsis
on the left if the string was shortened - mabbreviate:length or cabbreviate:length – will take up to length characters from the
string, inserting an ellipsis in the center of the string if necessary - abbreviate:length or rabbreviate:length – will take up to the first length characters,
inserting an ellipsis on the right if the string was shortened
For example, {{project.name|abbreviate:8}} will limit the length of the project name to the
first 5 characters followed by an ellipse. A project name of “My Project” would be
shortened to “My Pr…” for display purposes.
レポートファイル名 (Report Filename)
The template used to generate filenames for reports may be customized. This can
be done by setting the report.filename-template property. See the Report Configuration
Templates section for details on valid values.
The default template is {{project.name}} ({{date:dd MMM YYYY}}) – which will produce
filenames such as “My Project (27 Mar 2017).xml”
PDF Report Configuration
Company Logo
Your company logo can be displayed on the cover of PDF reports. For best results,
the image should be at least 432 pixels wide and/or 144 pixels tall. Set the
report.pdf.custom-logo property to the filename of the logo. The file can be located in
the same folder as the codedx.props file or, if the file is located elsewhere, specify the
path with the filename. The default is no company logo.
Limits
There are limitations in place on the PDF report. Depending on the hardware
configuration of the machine running Code Dx, you may be able to increase these
limits. Be aware that raising these limits will increase memory requirements.
The limits may be changed by adjusting the following options:
- report.pdf.dast-body-limit [default: 8192] – sets the limit, in bytes, of DAST bodies
to be displayed in the PDF report - report.pdf.details-simple-limit [default: 50000] – sets the number of findings to
restrict simple details to in the PDF report - report.pdf.details-source-limit [default: 5000] – sets the number of findings to restrict
source code display to in the PDF report - report.pdf.dast-finding-limit [default: 1000] – sets the number of findings to allow
DAST request/response bodies to be displayed for in the PDF report
Extended Customization
There are options allowing for extended customization when using Code Dx
Enterprise. These customizations may be made by adjusting the following options:
- report.pdf.show-code-dx-logo [default: true] – controls whether the Code Dx logo
will be included on the cover - report.pdf.pdf-title [default: “Assessment Report: {{project.name}}”] – sets the title
of generated PDF reports; see the Report Configuration Templates section for
details on valid values - report.pdf.cover-page-title [default: “Assessment Report”] – sets the title shown on
the cover page of generated PDF reports; see the Report Configuration
Templates section for details on valid values - report.pdf.page-header [default: “{{project.name}} – Code Dx Assessment Report”]
– sets the header displayed at the top of all PDF report pages; see the Report
Configuration Templates section for details on valid values - report.pdf.disable-page-header [default: false] – if true, the page header will be
supressed on all pages - report.pdf.disable-page-footer [default: false] – if true, the page footer will be
supressed on all pages - report.pdf.japanese-mode [default: false] – if true, Japanese fonts will be used as
the primary font for all text in PDF reports. if false, Japanese fonts will only be
used to render Japanese characters
ツールの設定 (Tool Configuration)
props ファイルの設定 (props Setting)
Code Dx[は、ツール固有の設定ができます。それにより、これらツールからのデータをどのように扱うかを制御できます。
Veracode
When accessing Veracode via a Tool Connector, it is possible to load “Callstack”
information for each Veracode Flaw. (Veracode Callstack information is interpreted
as Code Dx Data Flow information for the corresponding results.) Doing so will
improve the decision-making process of agentless hybrid correlation, but comes at
a steep performance cost (roughly 1-2 seconds per flaw).
- veracode.callstack-load-enabled enables loading of the optional “Callstack” information when set to true. Defaults to false.
NowSecure
NowSecure uses lab-api as the default subdomain for the lab api, and lab as the
default subdomain for the user interface. Code Dx allows user-defined values for
these subdomains in the props file.
- nowsecure.lab-api-subdomain defines the subdomain for the lab api. Defaults to lab-api.
- nowsecure.lab-ui-subdomain defines the subdomain for the lab user interfance. Defaults to lab.
Configuration Files
いくつかのバンドルツールについては、Code Dx はシステムワイドあるいは、プロジェクトベースで、設定ファイルを定義することができます。Code Dxのappdataディレクトリ内において、tool-data ディレクトリがある事を確認して下さい。(ない場合は、作成する)ある特定のツールに対して、設定ファイルを定義するには、そのツール明のディレクトリ(下に名称は示す)を作成します。システムワイドの設定はそのディレクトリ内か、あるいは、プロジェクト単位の設定(必要なプロジェクトのIDのサブディレクトリを作って、その中に設定ファイルを格納する)
For some of the bundled tools, Code Dx provides the ability to define a
configuration file, either system-wide, or on a per-project basis. Within the Code Dx
appdata directory, locate the tool-data directory (or create it if it’s not present). To
define a configuration file for a tool, create a directory with that tool’s name (as
specified below). A system-wide configuration should be placed in that directory, or
for a per-project config, create a sub-directory named with the given project’s ID,
and place the configuration file in that sub-directory.
ScalaStyle
Code Dx supports user-defined config.xml scalastyle config files. Place the file within
the tool-data/scalastyle directory, or within a project-specific subdirectory. Files should
follow the format defined by scalastyle.
Code Dx also supports a user-defined scalastyle.props config file, for configuring the
JVM environment in which the scalastyle tool runs. Currently, the only supported
property is file.encoding, which will be passed to the JVM via the- Dfile.encoding
environment variable. This allows you to run scalastyle on projects that don’t use
the standard encoding.
Cppcheck
Code Dx supports a user defined cppcheck.conf config file. Create the file in the tool-
data/cppcheck directory, or within a project-specific subdirectory. Within that file, you
can define a value for the useThreads property (e.g. useThreads=4 to request that
Cppcheck use four threads). Also, Cppcheck will run with the –inline-suppr option
enabled by default, allowing you to suppress errors from within your source code.
This behaviour can be disabled by setting inlineSuppression=false. See the Cppcheck
Manual for more details on these settings.
You can also choose to define the platform property. This affects Cppcheck’s
configuration for platform specific types and sizes. By default Cppcheck will choose
the platform your Code Dx server is running on. Available platform options are as
follows:
- unix32 32 bit Unix variant
- unix64 64 bit Unix variant
- win32A 32 bit Windows ASCII character encoding
- win32W 32 bit Windows UNICODE character encoding
- win64 64 bit Windows
- avr8 8 bit AVR microcontrollers
- native Type sizes of host system are assumed, but no further assumptions.
- unspecified Unknown type sizes
PHP MD
Code Dx supports user-defined config.xml PHPMD ruleset files. Place the file within
the tool-data/phpmd directory, or within a project-specific subdirectory. Files should
follow the format defined by PHPMD.
PHP_CodeSniffer
Code Dx supports user-defined user_ruleset.xml PHP_CodeSniffer ruleset files. Place
the file within the tool-data/phpcodesniffer directory, or within a project-specific
subdirectory. Files should follow the format defined by PHP_CodeSniffer.
PMD
Code Dx supports a user defined pmd.conf config file. Create the file in the tool-
data/pmd directory, or within a project-specific subdirectory. Within that file, you can
define a value for the debug-logging property (e.g. debug-logging=true to enable verbose
PMD logs). You can also define a value for the encoding property (e.g. encoding=UTF-8
to set the character encoding PMD expects source to be in. Acceptable values are
any standard java.nio.charset.Charset character set). By default debug-logging=false, and
encoding=UTF-8.
ESLint
By default, Code Dx will pass –ignore-pattern **/node_modules/*
Code Dx supports user-defined .eslintrc and .eslintignore ESLint config files. Place the
file(s) within the tool-data/eslint directory, or within a project-specific subdirectory. Files
should follow the format defined by ESLint. You can use the js, yml, json, or eslintrc
formats. In the event that there are multiple config files present in different formats,
Code Dx will follow the same priority that ESLint uses. ESLint will also use any
.eslintrc config files uploaded in the project as defined by the rules explainedhere.
Additionally, Code Dx will search for an .eslintignore file in the root directory of the
uploaded zip file. The .eslintignore file in the zip will take precedence over the
.eslintignore file in the tool-data/eslint or project-specific directories. If you use a custom
config, be sure to adjust your Tool Configuration. By default, only the
recommended ESLint rules are enabled.
Code Dx also supports user-defined extension of the default eslintrc.json file. For
users wanting to add small tweaks to the default configuration, a eslint-config-extra.js
can be placed within the tool-data/eslint directory, or within a project-specific
subdirectory (a directory whose name is the numeric id of the Code Dx project), as
with the custom .eslintrc and .eslintignore files mentioned in the previous paragraph.
When running ESLint, Code Dx will search for this “extra” config file and, if present,
will include it as an extension of its default ESLint config file. The contents of the
eslint-config-extra.js file should be in the form module.exports = { … }, where the … is
replaced by your custom configuration as defined in the ESLint configuration guide.
Important note about using a custom .eslintignore file: If an .eslintignore file is
neither found in the uploaded zip file nor provided in the tool-data/eslint directory,
Code Dx will pass –ignore-pattern **/node_modules/* as a command-line argument to
ESLint. If you want to provide an .eslintignore file, it is a good idea to include the
**/node_modules/* pattern in that file; linting the contents of your third-party
dependencies is not recommended, and in some cases can cause ESLint to fail.
Several ESLint plugins are made available when running as a bundled tool in Code
Dx:
- eslint-plugin-security: enabled by default
- eslint-plugin-scanjs-rules: enabled by default
- eslint-plugin-no-unsafeinnerhtml: included as a requirement of scanjs-
rules
- eslint-plugin-no-unsafeinnerhtml: included as a requirement of scanjs-
- eslint-plugin-xss: enabled by default
- eslint-plugin-html: enabled by default
- eslint-plugin-react: enabled by default
- babel-eslint: enabled by default
Any of these plugins can be used in or excluded from your user-defined configs. All
plugins use their default or recommended rules and settings, except for no-location-
href-assign from eslint-plugin-xss. For this rule, Code Dx uses encodeURIComponent for
the escapeFunc option instead of the default escape function, which has been
deprecated. More information about how to configure these plugins can be found on
their respective npmjs or github pages.
By default, Code Dx will run ESLint on .js, .html, and .htm files. If you want to change
this behaviour, you can specify a comma separated list of file extensions with the
eslint.extensions setting in your codedx.props file. You do not need to include the . with
each file extension (eslint.extensions = js,html,htm). Note that if you decide not to use the
html plugin in your custom configs, you must use this setting to specify that you want ESLint to only run on .js files. Otherwise it will try to scan any .html and .htm files
it finds as javascript, which will cause ESLint parsing errors.
If you want to use your own ESLint environment, you can specify the path to it in
your codedx.props file with the eslint.path setting. Code Dx expects that the provided
directory will point to the folder containing ESLint’s bin folder. Code Dx will also try
to find any of the supported ESLint config files in this directory. Note that if you use
the global or project config files as described above, they will take precedence over
the ones in this folder.
JVMシステム・プロパティ (JVM System Properties)
You can set custom system properties for the JVM process that hosts Code Dx. To
do so, use the prefix codedx.jvmprops. on a line in your codedx.props file. For example,
to set the http.proxyHost system property to 1.2.3.4, add the following line:
codedx.jvmprops.http.proxyHost = 1.2.3.4
Note that specifying a setting this way will overwrite existing settings in the JVM.
For example, it is possible to overwrite the user.home property, which may be used
by logic within Code Dx. Beware of overwriting an important value! For a non-
exhaustive list of system properties to watch out for see
https://docs.oracle.com/javase/tutorial/essential/environment/sysprop.html
プロキシ設定 (Proxies)
Some enterprise features like JIRA Integration and Tool Connectors reach out to
third-party programs via HTTP(S). If your Code Dx server is running behind a
proxy, you can configure Code Dx to use that proxy for communications with these
programs by setting the appropriate JVM System Properties.
The following three properties are described in greater detailhere:
- http.proxyHost – The hostname, or address, of the proxy server, e.g.1.2.3.4 or myproxy.mydomain.com
- http.proxyPort – The port number of the proxy server (default: 80)
- http.nonProxyHosts – A |-separated list of hosts that should be accessed without
going through the proxy. (default: localhost|127.*|[::1])
The remaining properties are related to the specific http client library used by Code
Dx for outgoing communications, and must be set if your proxy requires authentication:
- org.asynchttpclient.useProxyProperties – set this to true
- org.asynchttpclient.useProxySelector – set this to false
- org.asynchttpclient.AsyncHttpClientConfig.proxy.user – the username for authenticating with the proxy
- org.asynchttpclient.AsyncHttpClientConfig.proxy.password – the password for
authenticating with the proxy
A typical proxy configuration in your codedx.props file will look something like this (of
course you will replace the values with ones specific to your own proxy):
codedx.jvmprops.http.proxyHost = 123.234.156.178
codedx.jvmprops.http.proxyPort = 3128
codedx.jvmprops.org.asynchttpclient.useProxyProperties = true
codedx.jvmprops.org.asynchttpclient.useProxySelector = false
codedx.jvmprops.org.asynchttpclient.AsyncHttpClientConfig.proxy.user = myproxyuser
codedx.jvmprops.org.asynchttpclient.AsyncHttpClientConfig.proxy.password = myproxypassword
Visual Log Configuration
By default, the visual log will not record “successful-login” events. To enable this, set the
auth.logging.recordSuccess = true. Note that changing this property will not retroactively
reveal successful logins from the past, as this setting determines whether to record
successful logins, not whether to show them.